
How to join the web of trust
by

Sergey Ichtchenko
Back in the 90s, there were these events called keysigning parties where people came together to verify each others cryptographic keys in real life and prove that they were who they claimed to be to each other. I think we should bring this tradition back!
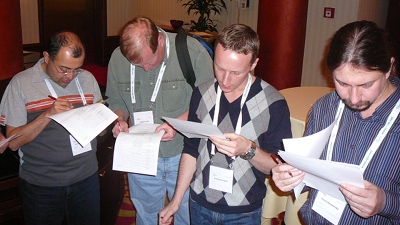
An example of a real-life keysigning party I found on Google
Wait, what is PGP and the web of trust?
But wait, I'm getting ahead of myself; let's start at the beginning. You start by generating a PGP (Pretty Good Privacy) key using a command-line tool called GPG (Gnu Privacy Guard). This key contains an identity string, which is your name, nickname, and email address, as well as an asymmetric cryptographic key that you can use to sign and encrypt data under your name. After you've created your key, you can use it to either - Sign messages to prove they were written by you; or - Encrypt messages with another person's key, so that they can only be read by them This seems pretty simple, but there are a lot of cool things you can do. For example, you can - Integrate this directly into your email to automatically sign and/or encrypt your email messages - Sign your Git commits to prove it was you who made them (and get a green "verified" badge on GitHub for each signed commit) - Send encrypted messages to your friends - Submit bug bounties encrypted using a company's public key - Link the key to your online identity to prove that the things you do online are done by you - Etc etc etc But, there's one interesting question: if you can choose your name when creating a key, can't you just pretend to be someone else by setting their name and email address as your identity string? The answer is yes! To get around this, people have come up with a cool thing called the *web of trust*. The key realisation is: if you can sign any data you like using your key, then you can also sign someone else's key. And then, the person can display your signature alongside their key to show that you trust them to be who they claim to be. It is generally accepted that if you want to sign someone's key, then you should meet them in real life and show each other your government-issued IDs to prove your identity before signing.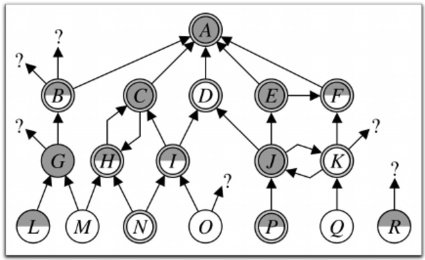 Let's look at this diagram: here, person **H** has signed person **C**'s key and vice versa.
So, they have both met up in real life and verified that they are who they claim to be.
Now, if I am person **N**, I have signed person **H**'s key and trust them to be who they say they are.
But since I trust them, I can also trust person **C** since person **H** has signed them.
And also, since person **C** has signed person **A**, I can be reasonably certain that **A** is who they claim to be as well.
The web of trust is important for the open software community, where PGP is used to sign and encrypt packages and messages.
Having the requirement of belonging to the web of trust reduced the potential for harmful packages to be included in open software.
For example, Debian requires developers to get their key signed by a trusted Debian community member before being able to contribute packages.
In fact, I had to do this in order to [submit my `meow` package](https://github.com/PixelSergey/meow) into the Debian repository!
I also think this is really cool otherwise and we should all do this to promote a culture of security and cryptography everywhere :)
[Here is a good article explaining keysigning in greater detail](https://www.cryptnet.net/fdp/crypto/keysigning_party/en/keysigning_party.html)
Let's look at this diagram: here, person **H** has signed person **C**'s key and vice versa.
So, they have both met up in real life and verified that they are who they claim to be.
Now, if I am person **N**, I have signed person **H**'s key and trust them to be who they say they are.
But since I trust them, I can also trust person **C** since person **H** has signed them.
And also, since person **C** has signed person **A**, I can be reasonably certain that **A** is who they claim to be as well.
The web of trust is important for the open software community, where PGP is used to sign and encrypt packages and messages.
Having the requirement of belonging to the web of trust reduced the potential for harmful packages to be included in open software.
For example, Debian requires developers to get their key signed by a trusted Debian community member before being able to contribute packages.
In fact, I had to do this in order to [submit my `meow` package](https://github.com/PixelSergey/meow) into the Debian repository!
I also think this is really cool otherwise and we should all do this to promote a culture of security and cryptography everywhere :)
[Here is a good article explaining keysigning in greater detail](https://www.cryptnet.net/fdp/crypto/keysigning_party/en/keysigning_party.html)
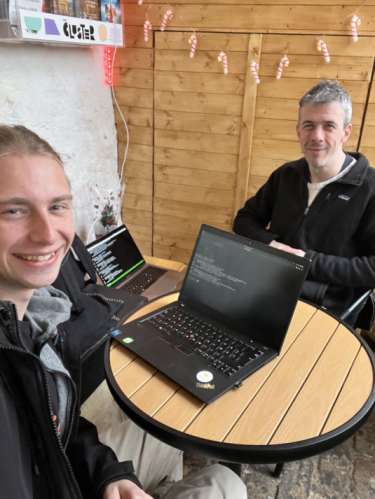 *Me meeting up with a Debian developer and getting my key signed!*
Instructions
This tutorial is based very roughly on the Debian keysigning guide
Step 1: Install GnuPG
- On Debian/Ubuntu: run
sudo apt install gnupg - On NixOS: add
pkgs.gnupgto your configuration - On Windows: install WSL/Ubuntu and do it there (preferred) or use GPG4Win
Step 2: Generate the key
- Open your terminal
- Run
gpg --full-gen-key - Pick
ECC (sign and encrypt)ECCis now the preferred method, butRSAmay be required if you are working on some really old systems that don’t supportECC- If you pick
ECC, select the optionCurve 25519 - If you pick
RSA, select a keysize of4096
- Make the key expire after a number of years
- 5 years is good
- This doesn’t mean you lose your key after 5 years: you can always renew it
- An expiry date is recommended since it will prevent misuse and confusion if you accidentally lose your keys
- Enter your details
- The name must be your REAL name if you want to be added to the web of trust later on
- The email should be your primary email, you can add other email addresses later on
- The comment is just a nickname or a username you use everywhere (optional)
- Enter a passphrase and store it in your password manager
Step 3: Upload your key to the keyservers
In order for others to find your key, you need to publish your public key to a keyserver. Keyservers will usually share and update keys between each other, but it doesn’t hurt to upload them to multiple servers all at once.
- Find your key fingerprint by running
gpg --list-keys- Your fingerprint is the long string of numbers and capital letters
- Copy this and paste it instead of the word
FINGERPRINTin all of the lines below
- Run
gpg --keyserver https://keys.openpgp.org --send-key FINGERPRINT - Repeat the previous command with the following keyserver URLs instead of
keys.openpgp.org:https://keyserver.ubuntu.comhttps://pgp.surf.nlhttps://pgp.mit.eduhttps://keybase.io
Step 4: Signing a friend’s key
Both you and your friend should follow these steps at the same time to sign each others’ keys.
- Find a friend to sign each others’ keys with, and meet up in real life!
- Both of you run
gpg --fingerprinton your own laptop to find your key’s fingerprint- If you for some reason are in a situation where you don’t have your laptop, you can also print out your identity string and fingerprint on a piece of paper beforehand and give it to the other person :D Then, finish the rest of the guide later at home
- In the next steps, your friend’s fingerprint will be called
FRIEND_FINGERPRINT(don’t include any spaces)
- Show each other your official government-issued ID (passport, drivers’ license, or ID card) and make sure that the name you see next to the key fingerprint matches with the ID document
- On your laptop, run
gpg --recv-keys FRIEND_FINGERPRINT- You can also specify
--keyserver KEYSERVERif you have a specific keyserver URL you want to use
- You can also specify
- Run
gpg --fingerprint FRIEND_FINGERPRINTand make sure all the information is still correct - Sign their key using
gpg --sign-key FRIEND_FINGERPRINT - Run
gpg --armor --export FRIEND_FINGERPRINT | gpg --encrypt -r FRIEND_FINGERPRINT --armor --output FRIENDNAME_signedby_YOURNAME.asc- This will export a signed version of your friend’s key, encrypted with your friends key so only they can read it
- This is to make sure that the person whose key you’re signing actually owns the private key
- So, if Alice signs Bob’s key, this will create a file called
bob_signedby_alice.ascwhich only Bob can read and which contains the signature
- Take the file that was just created and send it as an email attachment to the email given in the key
When you receive an email attachment from your friend
- Download the file from the email (it should be called
YOURNAME_signedby_FRIENDNAME.asc) - Run
gpg -d MYNAME_signedby_FRIENDNAME.asc | gpg --import- This will decrypt and import the signature your friend has created
- Run
gpg --keyserver https://keys.openpgp.org --send-key FINGERPRINT - Repeat the previous command with the following keyserver URLs instead of
keys.openpgp.org:https://keyserver.ubuntu.comhttps://pgp.surf.nlhttps://pgp.mit.eduhttps://keybase.io
That’s it! Now, you have a signature from your friend and your friend has your signature. Anyone who trusts one of you can most likely trust the other too. Now, just sign as many people as you can ;)
What can I do with my PGP key?
Here are some cool things you can integrate your new PGP key into:
Manually sign and encrypt messages
Signing
- To add a signature to a file:
gpg --armor --output FILE.asc --clear-sign FILE - To make a separate signature file:
gpg --armor --output FILE.asc --detach-sign FILE - To verify a file signature:
gpg --verify FILE - To verify a separate signature:
gpg --verify FILE.asc FILE
Encrypting
- To encrypt a file with someone else’s key:
gpg --recipient FRIEND --output FILE.asc --armor --encrypt FILE- Here,
FRIENDcan be either their key ID or their email address
- Here,
- To decrypt a file encrypted by someone else with your key:
gpg --output FILE --decrypt FILE.asc
Set up email encryption and signing
- Install the Thunderbird email client
- Go to
Account Settings > End-to-end encryption - Go to
OpenPGP > Add keyand add your key - Now, when you compose a new email, you can choose to automatically sign it with your own key or encrypt it with your friend’s key! Super easy
Set up Git commit signing
Set up your key in GitHub:
- Run
gpg --list-keysto find your key fingerprint - Run
gpg --armor --export FINGERPRINTand copy the output - Go to GitHub, navigate to
Settings > SSH and GPG keys - Click on
New GPG keyand paste your key in
Set up automatic commit signing:
- Run
gpg --list-keysto find your key fingerprint - Run
git config --global user.signingkey FINGERPRINT - Run
git config --global commit.gpgsign true - It should now work! You should have your commits sign automatically, and GitHub will show a “verified” badge for your commits
- If you get errors, try running these and see what happens
export GPG_TTY=$(tty)(add this to your.bashrcfile)git config --global gpg.program gpg2
- To view signatures, run
git log --show-signature